Getting data from a Ginlong Solis inverter into Zabbix

I have a Ginlong PV inverter being driven by two strings of solar panels. The inverter has a wifi dongle [“Wifi Stick Datalogger version 3.5”] that reports data back to Solis every 5 minutes.

The dongle has a basic web interface with a few parameters on it.
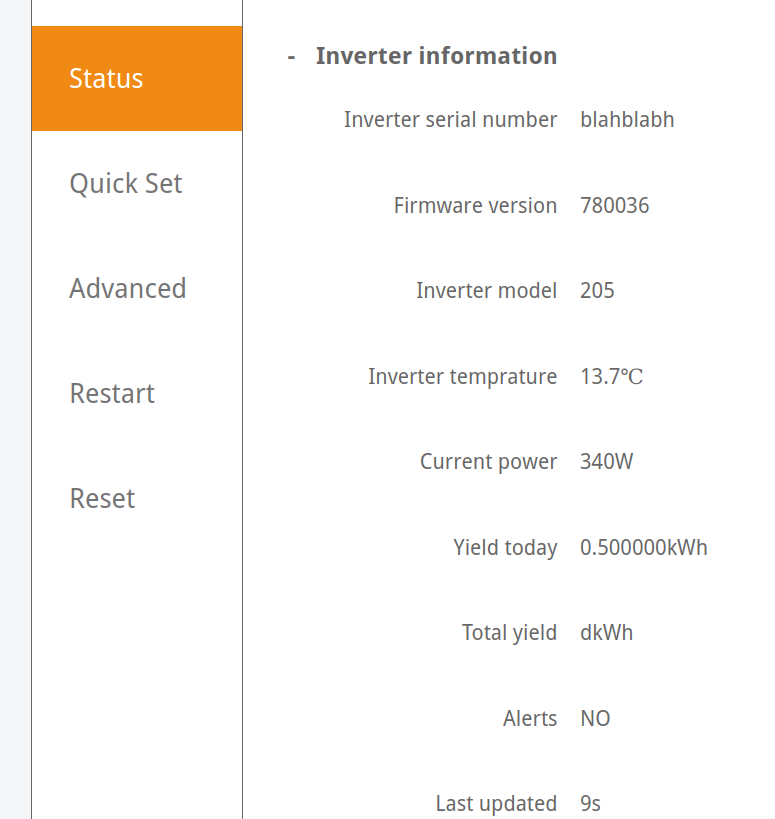
Polling the web interface does not poll the inverter. The dongle polls the inverter on a 5 minute cycle regardless of how often you attempt to fetch the data. Puzzlingly, the web interface has Javascript loop that fetches /inverter.cgi every 10s showing a countdown, to fool you into thinking you’re looking at recent data. Monitoring the output for a few hours soon proves that it’s only 5-minute resolution. /inverter.cgi is one line of semicolon-separated values, which is helpful for acquiring the data, no screen-scraping required.

The web interface uses basic auth. When first set up the dongle has a password of 123456789. After being adopted on the Solis cloud, the admin password will be changed to the wifi PSK; this doesn’t seem to be documented anywhere.

This sounds ideal for integrating with Zabbix but it was trickier than expected. I couldn’t get any of the three web data fetching types to work. I think the problem was the presence of 50 or so NULs in the output. I ended up using wget from a cronjob to pull the data, written to a log file on the server

*/5 * * * * bash -c "/usr/bin/wget http://inverter/inverter.cgi --http-user=admin --http-passwd=wifipsk -O - --quiet | head -n1 |ts >> /tmp/inverter.log"

and read in to Zabbix with a log[] item. My cron job pipes the output through ts to timestamp the data. I still had to use preprocessing steps to convert the CSV to JSON, to use the JSONPath support to pick out items. Puzzlingly, I had to remove extraneous [ and ] created by the CSV to JSON step before I could get the JSONPath items to work.
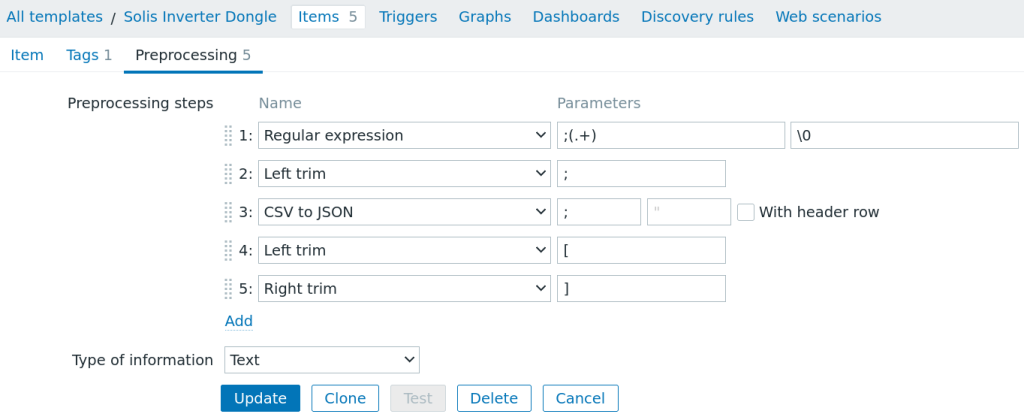
Zabbix template here.

But every 5 minutes is way too long!

Yep, agreed. To break the “5 minute barrier” we need to talk directly to the inverter with an RS-485 adaptor and Modbus. An FT232-based USB adaptor with screw terminals was acquired, as was the obscure Exceedconn EC04681-2014-BF plug. The plug cost twice as much as the RS-485 adaptor. I wired the dongle in parallel with RS-485 adaptor so both can work. The dongle is powered by the inverter so if the dongle can’t be pinged then the panels aren’t generating.

I modified the python script from here:

https://sequr.be/blog/2021/08/reading-ginlong-solis-inverter-over-serial-and-importing-in-home-assistant-over-mqtt/

and feed the output into zabbix_sender.

This is my version of the Python script. This is the associated Zabbix template.

For now, all I have is a simple bash while loop that pipes it into zabbix_sender:

$ while sleep 30 ; do ./solis-rs485.py | zabbix_sender -i - -r -s solisinverter -z localhost ; done

I only really need 1-minute updates on this, but randomly it will fail with a checksum error, so every 30s will ensure I get at least 1-minute data.

OpenEnergyMonitor forums were a helpful source of information here.

Modbus register numbers are confusing: Many of the examples use a 5-digit register number starting with 3, and many of them are 4 digits starting with 3. Also, you subtract 1 from the register number you want. This is covered by the Solis documentation, but not commented on in many of the code examples:

“the register address needs to offset one bit. Example: register address: 3000, the send address is 2999.”

Why not just be the actual register number? Also, many examples assume you only have a single string.

TODO: systemd unit to run this automatically.

Update 2024/03/03: the Paho MQTT library was updated recently, so

client = mqtt.Client(client_id)
is now

client = mqtt.Client(mqtt.CallbackAPIVersion.VERSION1, client_id)
welle-cli SDR DAB server on Raspberry Pi 4

welle.io is a software-defined DAB/DAB+ decoder. It works with RTL-SDR and SoapySDR-compatible tuners.

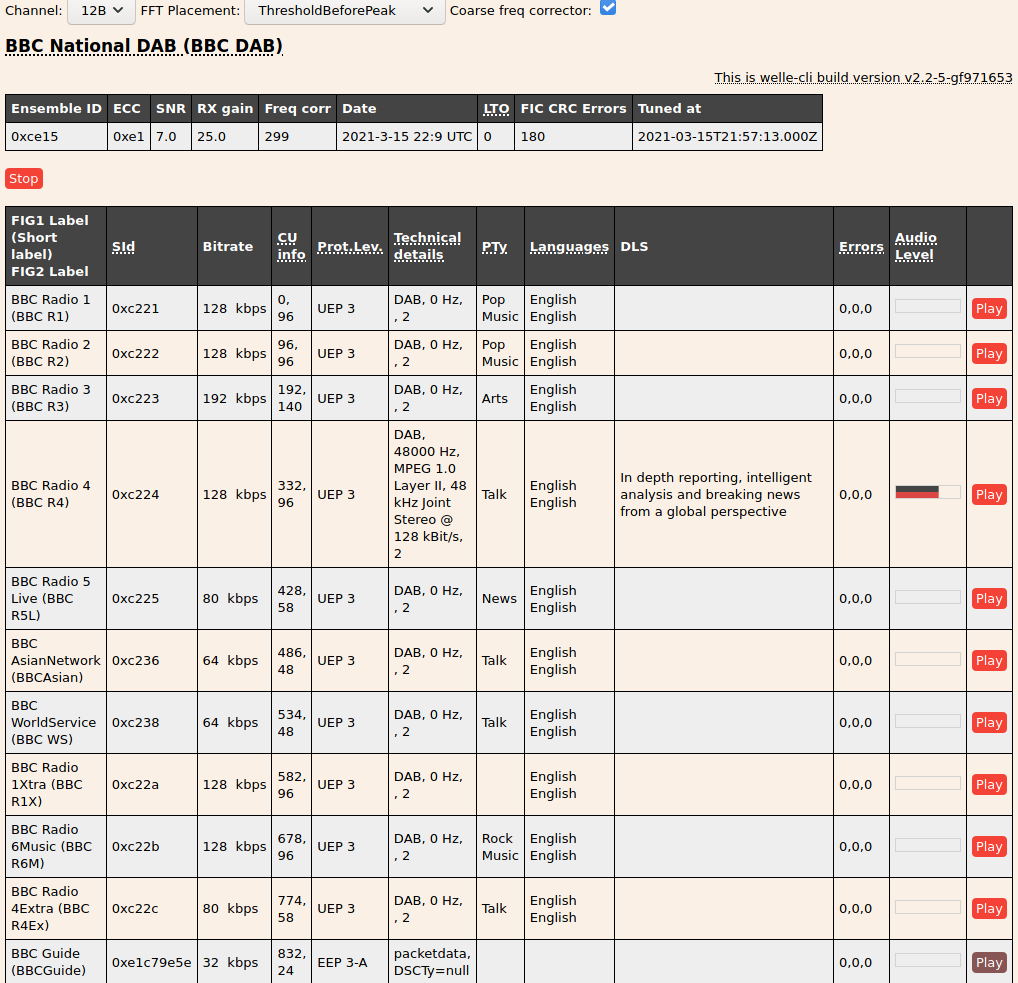
welle-cli is more than a mere CLI tool, as it provides a web interface for information about the DAB multiplex you’re tuned to, as well as an MP3 stream for each channel in the multiplex. This is what it looks like when I’m listening to Radio 4:

I have welle-cli running on a Raspberry Pi 4B, with an SDRPlay RSP1a connected with USB.

The official instructions for building on Raspbian cover the GUI [welle.io] which I don’t require for this application.

This is what I had to do build just the CLI:

apt install libtool libusb-1.0-0-dev librtlsdr-dev rtl-sdr build-essential autoconf cmake pkg-config libfftw3-dev libmpg123-dev libfaad-dev libsoapysdr-dev

[RTL stuff probably isn’t 100% necessary just for Soapy, but I want to test this with an RTL dongle at some point too].

git clone https://github.com/AlbrechtL/welle.io
mkdir welle.io/build
cd welle.io/build/
cmake .. -DRTLSDR=1 -DSOAPYSDR=1 -DBUILD_WELLE_IO=OFF -DBUILD_WELLE_CLI=ON
make
make install

All being well, you will have a welle-cli in /usr/local/bin at the end of this.

The RSP1a has notch filters for VHF FM and DAB broadcast bands. I found that these had to be on in order to get DAB sync. This is the opposite of what I expected and will continue to investigate this.

cd /usr/local/share/welle-io/html

welle-cli -s "driver=sdrplay,soapy=0,rfnotch_ctrl=true,dabnotch_ctrl=true" -w 8888 -c 12B

gives me a working web interface on port 8888, tuned to multiplex 12B. Note that if you don’t start this from its HTML directory, the web interface will not load!

CPU usage on the Pi 4B is between 85-100% of one core when serving a single stream. Performance seems to be fine, I haven’t been able to discern any signs of hitting resource limits here. CPU temp is 49°C with the loft temperature at 12°C. The web interface is a bit chatty – merely having it idle in tab requires 110kbps/22pps of network traffic, which could impact resources on smaller platforms. This is notable because it’s more than 50% of the bandwidth that listening to a single stream consumes. The polling interval for the web interface can be tweaked in index.js.

So far, I have not been able to get a stream to play for more than a few minutes. The gain figure starts at around 25 then gradually rises, then the SNR drops, then the bubbling mud commences. I have to restart welle-cli to get a usable signal again. This seems like an AGC issue.

ESP32 Audio Kit with squeezelite-esp32

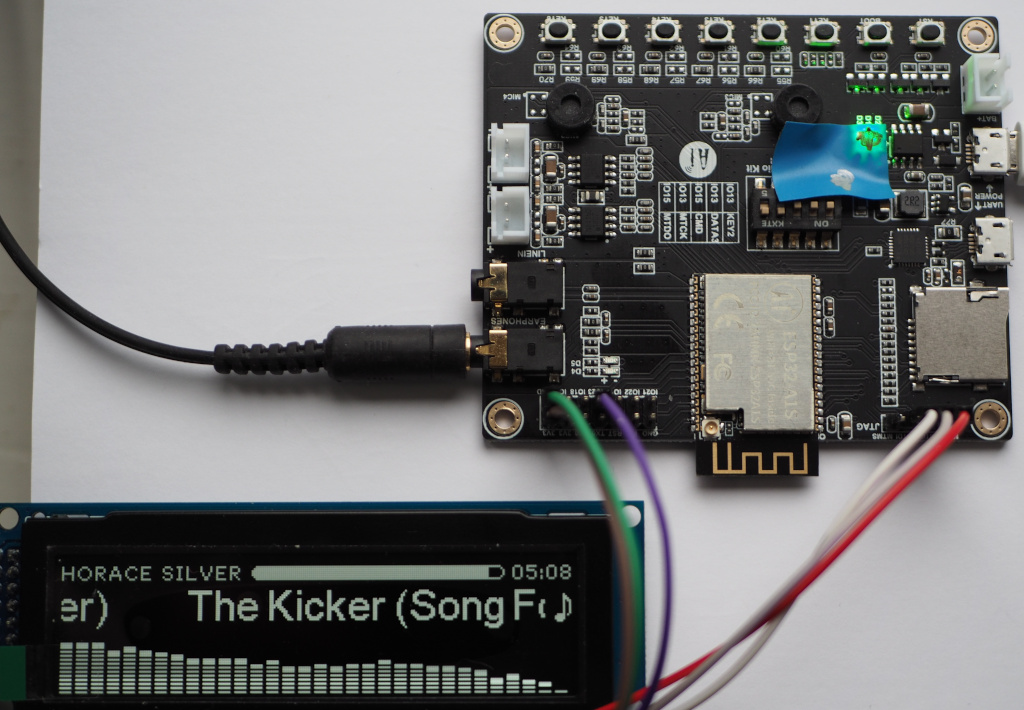
AI Thinker ESP32-A1S Audio Kit v 2.2 board.

No-name SSD1322 display, with 0-Ohm resistors set to 4-wire SPI mode.

KY040 rotary encoder.

squeezelite-esp32 firmware version ESP32-A1S.552.master-cmake

Much experimenting required to get a working permutation of GPIO selections. With assistance from the forums, I have eventually found that the following configuration:

display_config:

SPI:width=256,height=64,cs=0,reset=19,speed=8000000,driver=SSD1322,HFlip,VFlip,rotate

spi_config:

data=22,clk=13,dc=5,host=1

rotary_config:

A=23,B=18,SW=15

DIP switch positions, reading left to right: Off/Off/Off/On/On.

Wired as follows:

LCDESP32 Audio Kitsqueezelite-esp32 parameter
1 – GroundGND
2 – 3V33V3
4 – SCLKIO13 (labelled MTCK)spi_config: clk=13
5 – SDINIO22spi_config: data=22
14 – DCIO5spi_config: dc=5
15 – ResetIO19*display_config: reset=19
16 – CSIO0display_config: cs=0
Rot EncESP32 Audio Kitsqueezelite-esp32 parameter
CLKIO18rotary_config: B=18
DTIO23rotary_config: A=23
SWIO15 (labelled MTDO)rotary_config: SW=15
+3V3
GNDGND

gives a working display + rotary encoder.

When relocating Reset, I noticed that the display does not seem to require it.

Why is there some electrical tape on it? Because the LEDs on the board, particularly D1, are obnoxiously bright.

Amplification is provided by 2x NS1450, “a Low EMI, Filterless, 3W Mono Class D Audio Amplifier”, with the caveat being that it’s only filterless if the wire to the speakers is less than 100mm.

Todo: build an enclosure, acquire some suitable speakers, have a look at what types of batteries this thing can manage.

Bill of materials so far:

ESP32-A1S Audio Kit – £10

3.12″ SSD1322 OLED display – £16

3x JST XH 2-pin connectors – £1.8

12x DuPont jumpers – £2

1x HW040 rotary encoder – £0.8

Took quite a while to find a permutation of GPIOs that let the amp, rotary encoder and the display work simultaneously.

set_GPIO 21=amp,39=jack:0

It seems like there is some interaction between GPIOs that isn’t what you’d expect from the actual GPIO numbers.

Thoughts on this so far

First, the negatives:

Audio quality isn’t great. Higher frequencies are a bit mushy. Fine for building a little portable streaming speaker, though.

Documentation for this board is sparse. The manufacturer’s pages are all now 404s.

Green LED D1 is needlessly bright.

The GPIO assignments are bit mysterious [although to be fair, this is the first ESP32 project I’ve done]. Changing one thing causes others to mysteriously stop working. The 5 DIP switches on the board are confusing labelled – they are all labelled IO13 or IO15, but MTDI is IO12.

The firmware is not “done” yet. I have had the occasional core dump/reboot, but I expect this to improve with time.

The positives:

It’s very cheap. £10 delivered to the UK.

It’s all in one – buttons, DAC, amp and charge controller – but with the caveat that the GPIOs are what they are, and that’s that.

What are the alternatives?

Raspberry Pi Zero W [£10] + HiFiBerry Pi Zero MiniAMP [£15.5] + an SD card. Identical power output specs, probably better audio quality. Would need to do something for battery management. More than twice the price. piCorePlayer would be the obvious OS to run on this.

ESP32 WROVER board + DAC + amp. Bit more work selecting the components to use but no fussing with GPIO confusion.

Olimex ESP32-ADF – very similar specs to the ESP32 Audio Kit. Can’t confirm that it works with squeezelite-esp32. Note that Espressif’s software framework is called “ESP-ADF” and this piece of hardware from Olimex is called “ESP32-ADF”, so have fun googling that!

What else could be done with an ESP32 Audio Kit?

Wifi intercom – a pair of these could work back-to-back with some kind of SIP stack running on each. Press a button, a call is set up to the other unit and audio starts flowing between them immediately. More than two and you’d need an external server to do the audio mixing [eg, Freeswitch]. Call setup times would have to be pretty rapid for this to work.

Power consumption

Figures are per minute. Tested with a cheap UT-25 type USB tester.

  • Playing through the speakers, volume level 24: 18mWh
  • Through the headphone jack at volume level 30: 18mWh
  • Idle, or “off”: 8mWh
  • Display off in “off” mode: same!
  • Changed clock mode to hh:mm [ie, no seconds]: 6mWh

Two surprises here: the OLED being off or on seemed to make no difference to the power consumption, and neither did running through the speakers vs. headphones. Waking up regularly to process display updates seems to be relatively expensive.

PMS5003, Pi Zero W and Zabbix

Living near a busy road, I have recently taken an interest in air quality. To that end, I have acquired a PMS5003 from Pimoroni to connect to a Pi Zero W that I had been auditioning Pi Core Player on. [efn_note]Pi Core Player is great – especially as I have a venerable [but still working] Slimp3 connected to Logitech Media Server – but it’s a project for another day.[/efn_note]

The PMS5003

The PMS5003 is matchbox-sized and works by means of a fan that draws air over a laser which shines at an optical sensor. Airborne particles interrupt the laser beam and thus the device can count them. I am not sure how it determines the sizes of the particles. If you’re worried about noise, don’t be – the fan is quiet to the point of being inaudible. The PMS5003 is powered from the Pi Zero W so in hardware terms this is a fair simple project to put together.

Pimoroni have written a Python library for the PMS5003 so that seems like the sensible place to start. The examples/all.py script that comes with the library seemed like a good starting point, but by default it outputs values once per second which is far more frequent than I have any use for, so I added a time.sleep statement to make the script pause for 30 seconds after each output:

...
while True:
    data = pms5003.read()
    print(data)
    time.sleep(30)

This is what the output of all.py looks like:

PM1.0 ug/m3 (ultrafine particles):                             1
PM2.5 ug/m3 (combustion particles, organic compounds, metals): 1
PM10 ug/m3  (dust, pollen, mould spores):                      3
PM1.0 ug/m3 (atmos env):                                       1
PM2.5 ug/m3 (atmos env):                                       1
PM10 ug/m3 (atmos env):                                        3
>0.3um in 0.1L air:                                            318
>0.5um in 0.1L air:                                            94
>1.0um in 0.1L air:                                            6
>2.5um in 0.1L air:                                            4
>5.0um in 0.1L air:                                            2
>10um in 0.1L air:                                             1

Getting data from Pi to Zabbix

Why Zabbix? It collects time-series and textual data, presents it in different ways and carries out actions when certain thresholds are met. I have extensive experience of Zabbix through using it at work and I already have it installed at home for monitoring my small network, so it seems like a good place to start.

Approach 1 – send values with zabbix_sender

The first approach I tried with Zabbix was to use zabbix_sender to send each value to Zabbix as it arrived from all.py. This consists of ~50 lines of Perl to convert the output of all.py to the form expected by zabbix_sender, and joins the two processes together with pipes. The advantage of this method is that the raw data does not need to be written to disk, which is a worthwhile consideration on an I/O-constrained platform running off a cheap MicroSD card.[efn_note]I could, of course, have skipped the intermediate Perl script if my Python was any good; I spent a good few hours trying to reformat the data with Python but couldn’t get past the problem of the data structure from the PMS5003 library not being “iterable”. I eventually concluded that I’m only doing this For Fun and I wasn’t particularly enjoying myself.[/efn_note] If zabbix_sender loses contact with the server, or pms5003-all.py dies, the whole thing aborts. I use a systemd unit file to keep the script running, but I found that systemd was preventing pmsprocessor.pl from exiting when either child dies, in contrast to what happens when running pmsprocessor.pl interactively. After throwing out this question to the collective genius of the #a&a IRC channel, TC dug up the IgnoreSIGPIPE option in systemd, which defaults to true. When set to false in the unit file, it all now behaves as expected!

Approach 2 – read values from a logfile

The second approach I tried is to write the output of all.py to a log file, via the ‘ts’ command from moreutils. The Zabbix agent then reads this log file and sends interesting values to the server. Outputting the values every 30s results in about 2MB/day of data. The advantage to this approach is that it simplifies the pipeline – our data source and sink operate independently of each other and don’t need to know what state the other is in. The disadvantage is the additional I/O as mentioned above, and now I also have a growing log file to manage somehow. It’s not enough just to truncate the file; you have to stop the process, clear it down and restart it.

Handling data, server-side

I created nine Zabbix items to handle the 12 parameters output by all.py. What about the other three? The (atmos env) versions always appear to be the same as the first three parameters, so I am not bothering to store them separately. The zabbix_sender items are “trapper” type, and they match the arbitrarily chosen item names in pmsprocessor.pl.

The output

Here are six hours of data, as plotted by Zabbix: